To change engine oil, start by positioning the drain pan under the oil drain plug. Unscrew the plug to drain the oil completely.
Next, replace the oil filter and add new oil to the engine. Check the oil level and dispose of the old oil properly. Changing engine oil is a crucial maintenance task that ensures your vehicle runs smoothly and efficiently. By following a few simple steps, you can easily change the oil at home and keep your engine in top condition.
In this guide, we will walk you through the process of changing engine oil in 10 easy steps. Let’s get started!
Credit: www.instructables.com
Introduction To Diy Oil Changes
Learn how to perform a DIY oil change in 10 simple steps. Begin by raising the vehicle and positioning a catch pan beneath the oil drain plug. Then, remove the plug to drain the old oil, replace the filter, and add new oil.
Verify the oil level using the dipstick to complete the process.
Benefits Of Learning To Change Your Oil
Learning to change your own engine oil has several advantages:
- Cost-effective: Saves money on labor costs.
- Convenience: No need to schedule appointments at a garage.
- Knowledge: Gain a better understanding of your vehicle’s maintenance.
- Control: Ensure quality oil and filter are used.
Safety First: Preparing For The Task
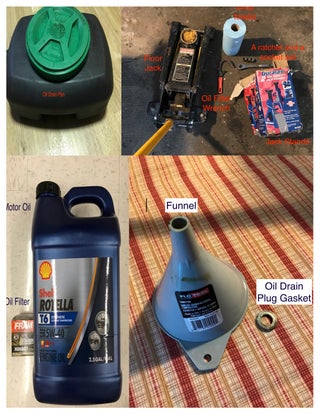
Before starting the oil change process, ensure you have the following:
| Equipment | Supplies |
| Safety glasses | Motor oil + oil filter |
| Gloves | Wheel ramps + chocks |
| Ratchet + socket set | Oil filter wrench + torque wrench |
| Oil drain pan | Funnel + oil pan |
| Clean rags + newspapers |
Gathering The Necessary Tools and Materials
To begin the process of changing engine oil, gather the necessary tools and materials, such as motor oil, oil filter, safety glasses, gloves, and a socket set. Position the drain pan beneath the oil drain plug, unscrew it, and allow the old oil to drain completely before proceeding with the oil change.
Choosing The Right Oil and Filter
Choosing the right oil and filter for your vehicle is an essential part of changing your engine oil. It is important to check your vehicle’s owner manual to determine the type and viscosity of oil recommended by the manufacturer. In addition, you should also choose an oil filter that is compatible with your engine. This will ensure that your engine is protected and operates at its best.
Essential Equipment for an Oil Change
To change your engine oil successfully, you will need some essential equipment. Here are some of the most common tools and materials you will need:
- Motor oil and oil filter
- Oil drain pan
- Oil filter wrench
- Ratchet and socket set
- Funnel
- Clean rags
- Safety glasses and gloves
- Wheel ramps or jack stands
It is important to have all of these tools and materials on hand before you start changing your engine oil. This will help ensure that you can complete the job safely and efficiently. Now that you have gathered all the necessary tools and materials, you are ready to start changing your engine oil. With the right equipment and a little bit of know-how, you can easily change your oil and keep your vehicle running smoothly.
Vehicle Preparation Steps
To change engine oil, ensure the vehicle is on level ground. Locate the oil drain plug, unscrew it, and let the oil drain. Replace the oil filter, add new oil, and check the oil level.
Lifting The Car Safely
1. Drive the car onto wheel ramps.
2. Engage the parking brake.
3. Place chocks behind the rear wheels.
Positioning The Drain Pan
1. Place the drain pan directly under the oil drain plug.
2. Ensure the pan is secure and properly positioned.
3. Double-check to avoid spillage.
Make sure to follow these vehicle preparation steps carefully for a successful oil change process.
Draining The Old Oil
When it comes to changing your car’s engine oil, the process of draining the old oil is a crucial step. It’s essential to remove the old, used oil to ensure optimal engine performance and longevity. Follow these steps carefully to drain the old oil from your vehicle’s engine.
Locating The Oil Drain Plug
Before draining the old oil, you need to locate the oil drain plug on the engine block. This plug is typically located underneath the engine and may require you to raise the vehicle using ramps or a jack. Refer to your vehicle’s manual for the exact location of the oil drain plug, as it can vary depending on the make and model of your car.
Removing The Plug and Draining Oil
Once you’ve located the oil drain plug, position a drain pan beneath it to catch the old oil. Use a ratchet and socket set to carefully remove the oil drain plug. Ensure that the drain pan is positioned directly beneath the plug to catch all the old oil as it drains out. Be cautious of the hot oil and allow it to drain completely before proceeding to the next step.
Replacing The Oil Filter
When changing the engine oil, it’s important to replace the oil filter to ensure optimal performance and longevity of the engine. The oil filter plays a crucial role in trapping contaminants and preventing them from circulating through the engine, so replacing it is an essential step in the oil change process.
Accessing The Oil Filter
Before replacing the oil filter, you need to locate and access it. The oil filter is typically located near the bottom of the engine, but the exact position may vary depending on the make and model of your vehicle. Use a flashlight and a mirror if necessary to locate the oil filter housing.
Removing And Installing a New Filter
Once you’ve located the oil filter, it’s time to remove the old filter and install a new one. Here’s a step-by-step guide:
- Place an oil drain pan underneath the oil filter to catch any residual oil.
- Using an oil filter wrench, carefully loosen and remove the old oil filter by turning it counterclockwise.
- Dispose of the old oil filter in accordance with local regulations for used oil and filters.
- Before installing the new oil filter, apply a thin layer of fresh oil to the rubber gasket to ensure a proper seal.
- Hand-tighten the new oil filter onto the engine, then use the oil filter wrench to turn it an additional three-quarters of a turn to secure it in place.
- Wipe away any excess oil around the filter housing and ensure it is clean and free of debris.

Credit: m.youtube.com
Reinstalling The Drain Plug
To reinstall the drain plug, carefully clean the plug and oil pan threads, then replace the plug and tighten it securely using a wrench. It’s crucial to ensure a proper seal to prevent oil leaks. Following these steps will help maintain the integrity of the engine oil change process.
Inspecting the Drain Plug and Washer After draining the old oil, inspect the drain plug and washer for any damage or wear. Make sure the threads on the drain plug are clean and undamaged to ensure a proper seal. Torquing the Plug to Specifications When reinstalling the drain plug, torque it to the manufacturer’s specifications. Use a torque wrench to tighten the plug securely but not over-tighten to avoid damaging the oil pan.
Adding New Oil
To add new oil during the process of changing engine oil, carefully pour the recommended amount of fresh oil into the engine using a funnel. Be sure to check the oil level using the dipstick and add more oil if necessary to reach the appropriate level.
Adding New Oil Once you have drained the old oil and replaced the oil filter, it’s time to add new oil. This is an essential step in the engine oil change process, and you must do it carefully to avoid any spillage or overfilling. Follow these two subheadings to add new oil to your car engine.
Selecting And Pouring the Correct Oil
Choosing the right oil for your car is crucial as it ensures that your engine runs smoothly and efficiently. Check your car owner’s manual to find the recommended oil grade and viscosity. Once you have the right oil, follow these steps to pour it into the engine:
- Locate the oil filler cap on top of the engine.
- Remove the oil filler cap and insert a funnel into the opening.
- Pour the oil slowly into the funnel.
- Check the oil level with a dipstick and add more oil if needed.
- Once you have added the correct amount of oil, replace the oil filler cap.
Checking Oil Levels with Dipstick
It’s crucial to ensure that you add the correct amount of oil to your engine. Overfilling or underfilling can cause significant damage to the engine. Use the dipstick to check the oil level in your engine. Follow these steps to check the oil level:
- Locate the dipstick, which is usually near the oil filler cap.
- Pull the dipstick out of the engine and wipe it clean with a rag.
- Reinsert the dipstick into the engine, ensuring it’s fully seated.
- Pull the dipstick out again and check the oil level against the markings on the dipstick.
- If the oil level is low, add more oil and recheck the level until it’s correct.
By following these two subheadings, you can add new oil to your car engine correctly and ensure that it’s at the correct level. Remember to dispose of the old oil correctly and safely.

Credit: www.academia.edu
Final Checks and Cleanup
After completing the 10 steps to change engine oil, it’s crucial to perform final checks and cleanup. Ensure the oil drain plug is tight, dispose of the old oil properly, and clean any spills for a smooth finish. This meticulous process guarantees a job well done.
Inspecting for Leaks: Before wrapping up, inspect the engine for any signs of oil leaks. Check the oil drain plug and oil filter for tightness to prevent potential leaks. Proper Disposal of Old Oil: Dispose of the old oil properly by transferring it to a sealed container. Take it to a recycling center or an auto parts store that accepts use oil for proper disposal. Remember, a clean work area is essential for a successful oil change. Wipe down any spills and dispose of used materials responsibly to keep the environment safe.
Read More: Should You Run Engine before Oil Change?
Conclusion: Maintaining Your Vehicle
Maintaining your vehicle is crucial for its longevity and performance. Follow these 10 steps to change engine oil: find the right oil and filter, use ramps to raise the car, locate the oil filter and drain plug, remove the oil drain plug, remove the old filter, replace the drain plug and filter, add new oil, check the oil level, and dispose of the old oil properly.
Keep your engine running smoothly by changing the oil regularly.
Benefits Of Regular Oil Changes
Regular oil changes are essential for maintaining the health and longevity of your vehicle. By consistently changing your engine oil, you can prevent wear and tear on crucial engine components, ensuring smooth operation and optimal performance. Additionally, regular oil changes can improve fuel efficiency, reduce harmful emissions, and extend the lifespan of your vehicle.
When To Plan Your Next Oil Change
It is recommended to plan your next oil change based on your vehicle’s manufacturer guidelines, typically every 3,000 to 5,000 miles for conventional oil and up to 7,500 miles for synthetic oil. However, it’s important to consider your driving habits and environmental conditions, as these factors can impact the frequency of oil changes. Regularly checking the oil level and condition can also help determine when it’s time for your next oil change.
Frequently Asked Questions
What Is the Procedure to Change Engine Oil?
To change engine oil, ensure the vehicle is cold and on level ground. Remove the dipstick and oil filler cap. Position a drain pan under the oil drain plug, unscrew it, and let the oil drain.
What Are The 5 Steps to an Oil Change?
To change your oil, first, raise the vehicle. Then, position the catch pan and remove the plug. Inspect the vehicle while the oil drains, reinstall the drain plug, and remove the old oil filter. Clean the mount, attach the new filter, and add new oil.
What Is Needed to Change Engine Oil?
To change engine oil, you’ll need motor oil, an oil filter, wheel ramps, safety glasses, gloves, a ratchet and socket set, an oil filter wrench, a torque wrench, a funnel, an oil pan, and clean rags. Position the drain pan, unscrew the oil drain plug, drain the old oil, and replace the filter.
What Is the First Thing You Do When Changing Oil in a Vehicle?
To change oil in a vehicle, start by locating the oil drain plug and filter. Then, drain the old oil, replace the filter, add new oil, and check the oil level.
Conclusion
Changing the engine oil is a crucial maintenance task that can be easily accomplished by following the ten simple steps outlined in this guide. By regularly changing the engine oil, you can ensure the longevity and optimal performance of your vehicle’s engine, saving you time and money in the long run.
Remember to adhere to the recommended oil change schedule specified by your vehicle’s manufacturer for best results.