To apply engine oil, turn off the engine and wait for it to cool down. Locate the oil filler cap and remove it, then use a funnel to pour the oil slowly into the engine.
Check the oil level frequently while filling to avoid overfilling. Properly applying engine oil is essential to keep your car running smoothly and efficiently. Regularly checking and topping up the oil level can extend the life of your engine and prevent costly repairs.
We will discuss the step-by-step process of applying engine oil to your car. We will also provide some helpful tips to ensure that you use the right type of oil and avoid common mistakes. By following these guidelines, you can keep your car’s engine in top condition and enjoy a trouble-free driving experience.
Introduction To Engine Oil Maintenance
Maintaining engine oil is crucial for the longevity of your vehicle. To apply engine oil, first, turn off your car and wait for the engine to cool. Then, remove the oil filler cap and slowly pour in small amounts of oil while frequently checking the oil level to avoid overfilling.
Importance Of Regular Oil Checks
Regular oil checks are crucial for maintaining the health and performance of your vehicle. Engine oil serves as a lubricant, ensuring that all the moving parts within the engine operate smoothly and efficiently. Regular checks help to ensure that the engine oil is at the optimal level, preventing excessive wear and tear on the engine components.
Furthermore, regular oil checks can help identify any potential leaks or issues with the engine, allowing for timely repairs and preventing more significant problems down the line. By making regular oil checks a part of your vehicle maintenance routine, you can extend the lifespan of your engine and ensure that your vehicle continues to run at its best.
Consequences Of Inadequate Oil Maintenance
Inadequate oil maintenance can lead to a range of severe consequences for your vehicle. Insufficient oil levels or the use of old, degraded oil can result in increased friction and heat within the engine, leading to accelerated wear on crucial components. This can ultimately result in costly repairs or even engine failure.
Additionally, inadequate oil maintenance can contribute to decreased fuel efficiency, as the engine has to work harder to overcome the increased friction. This not only leads to higher fuel consumption but also negatively impacts the overall performance of the vehicle.
Essential Tools for Oil Application
When it comes to applying engine oil, having the right tools and equipment is essential for a smooth and effective process. From choosing the right oil for your vehicle to gathering the necessary equipment, each step plays a crucial role in maintaining the optimal performance of your engine.
Choosing The Right Oil for Your Vehicle
Before you start the oil application process, it’s important to select the correct oil for your vehicle. Consider the manufacturer’s recommendations and specifications for your car. Consult the owner’s manual or look for the oil viscosity and quality grade recommended for your specific make and model.
Gathering The Necessary Equipment
Once you have identified the right type of oil for your vehicle, gather the essential tools and equipment needed for the application process. This includes:
- Oil Filter Wrench: To remove the old oil filter.
- Oil Drain Pan: For collecting and disposing of the old oil.
- Funnel: To avoid spillage when pouring new oil.
- Socket Wrench Set: For removing the drain plug.
- Rags or Paper Towels: For cleaning up any spills.
- New Oil: Ensure you have the correct type and amount of oil for your vehicle.
Preparing Your Vehicle
To apply engine oil to your vehicle, start by turning off the engine and allowing it to cool. Remove the oil filler cap and slowly pour in small amounts of oil at a time, checking the oil level frequently. It’s important not to overfill the engine, so add oil gradually until you reach the correct level.
For more detailed instructions, check out resources such as Castrol’s guide to topping up your engine oil or wikiHow’s tutorial on adding oil to your car.
Safety First: Ensuring A Cool Engine
Prior to applying engine oil, it is crucial to ensure that your vehicle’s engine is cool. This is essential for your safety, as working with a hot engine can lead to burns or other accidents. It is recommended to wait at least 30 minutes after running the engine to allow it to cool down. Touching the engine or any components directly after use can result in severe injuries.
Locating The Oil Filler Cap
Once the engine has cooled down, you can proceed with locating the oil filler cap. The oil filler cap is typically labeled and can be found on the top of the engine. It is usually circular or rectangular in shape and may have the word “oil” or an oil can symbol on it. Refer to your vehicle’s manual if you are having trouble identifying the oil filler cap.
Here are the steps to locate the oil filler cap:
- Open the hood of your vehicle and secure it properly.
- Look for the oil filler cap on the top of the engine.
- Inspect the cap for any signs of damage or leaks.
- If necessary, clean the area around the oil filler cap to avoid any dirt or debris from entering the engine.
By following these steps, you will be able to easily locate the oil filler cap and ensure that it is in good condition before proceeding with the application of engine oil.
Credit: www.autozone.com
Checking Oil Levels
Checking the oil levels of your engine is a crucial step in maintaining its performance and longevity. Regularly monitoring and topping up the oil levels ensures that your engine stays properly lubricated, reducing friction and preventing damage. In this section, we will guide you through the process of checking oil levels, including reading the dipstick accurately and interpreting oil level indicators.
Reading The Dipstick Accurately
Reading the dipstick accurately is essential to determine the oil level in your engine. The dipstick is a long, thin metal rod located near the oil cap. Follow these steps to read the dipstick:
- Make sure your engine is turned off and cool.
- Locate the dipstick and remove it from the engine.
- Wipe the dipstick clean with a cloth or paper towel.
- Reinsert the dipstick back into the engine until it is fully seated.
- Remove the dipstick again and observe the oil level.
The dipstick usually has two marks or indicators: a minimum (low) mark and a maximum (full) mark. The oil level should ideally be between these two marks. If the oil level is below the minimum mark, you need to add more oil.
Interpreting Oil Level Indicators
In addition to the dipstick, some vehicles have oil level indicators on the dashboard. These indicators provide a quick visual representation of the oil level. Here’s how to interpret oil level indicators:
| Indicator | Interpretation |
|---|---|
| Low oil light | If the low oil light is illuminated, it indicates that the oil level is below the recommended level. You should add more oil as soon as possible. |
| Oil pressure gauge | If the oil pressure gauge shows low pressure, it could indicate low oil level or other issues with the engine. Check the oil level and consult a professional if the problem persists. |
Remember, regularly checking and maintaining the proper oil levels is essential for the health of your engine. It’s recommended to consult your vehicle’s manual for specific instructions and intervals for checking and changing the oil.
By following these steps and understanding the importance of checking oil levels, you can ensure that your engine remains properly lubricated and performs optimally for years to come.
Selecting The Appropriate Engine Oil
Applying the right engine oil is crucial to ensure the longevity and performance of your vehicle’s engine. But with so many types of engine oils available in the market, it can be challenging to choose the right one. Here are some key factors to consider when selecting the appropriate engine oil:
Understanding Viscosity Grades
Viscosity refers to the thickness of the oil and its ability to flow. It is represented by a code that typically contains the letter ‘W’ followed by a number, such as 5W-30. The first number indicates the oil’s flow at low temperatures, while the second number indicates its flow at high temperatures. Therefore, the lower the number before the ‘W,’ the better the oil will flow in colder temperatures. On the other hand, the higher the number after the hyphen, the better it can withstand high temperatures.
Synthetic Vs. Conventional Oils
Another crucial factor to consider is the type of oil you’re applying. Conventional oils are made from crude oil, whereas synthetic oils are manufactured by blending various chemical compounds. Synthetic oils offer better performance in terms of protection against wear and tear, improved fuel efficiency, and longer lifespan than conventional oils. However, they are typically more expensive than conventional oils.
Ultimately, the choice of engine oil will depend on several factors, including your driving habits, the age of the vehicle, and the manufacturer’s recommendations. It’s important to consult your owner’s manual or a professional mechanic to help you make an informed decision.

Credit: www.homedepot.com
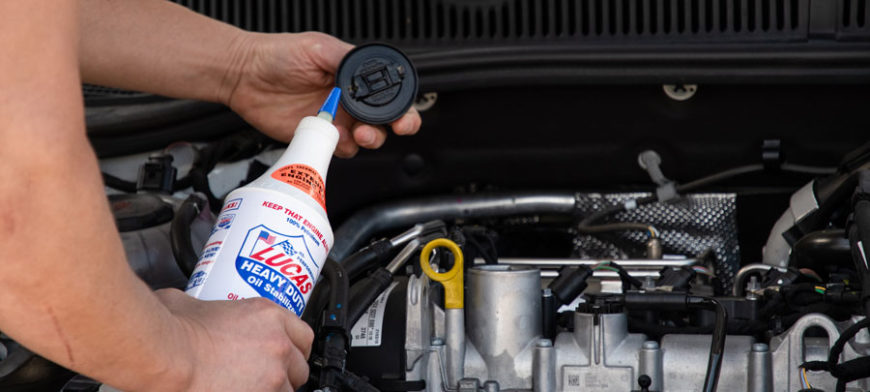
Adding Oil To Your Engine
To apply engine oil, ensure the engine is cool, remove the oil filler cap, and slowly pour a small amount at a time. Use a dipstick to check the oil level frequently while filling to avoid overfilling, which can cause engine issues.
When it comes to taking care of your car, adding oil to your engine is an essential task that must be done regularly. Not only does it keep your engine running smoothly, but it also helps prevent costly repairs in the future. In this article, we’ll go over a step-by-step guide to pouring oil and using a funnel to avoid spills.
Step-by-step Guide To Pouring Oil
1. First, park your car on a level surface and turn off the engine. Make sure the engine is cool before adding oil. 2. Locate the oil filler cap, which is usually located on top of the engine. Consult your owner’s manual if you’re having trouble finding it. 3. Remove the oil filler cap and wipe it clean with a rag or paper towel. 4. Take your bottle of engine oil and insert the funnel into the oil filler hole. 5. Slowly pour the oil into the funnel, making sure not to overfill. Check your owner’s manual for the correct oil level. 6. Once you’ve added enough oil, remove the funnel and wipe away any spills or drips. 7. Replace the oil filler cap and make sure it’s securely tightened.
Using A Funnel To Avoid Spills
Using a funnel when adding oil to your engine is a great way to avoid spills. It helps guide the oil into the engine and prevents it from spilling onto other parts of the car. Here are some tips for using a funnel: – Choose a funnel with a wide opening to make it easier to pour the oil. – Make sure the funnel is clean and free of debris. – Hold the funnel steady while pouring the oil to prevent it from tipping over. – Slowly pour the oil to prevent spills and overfilling. In conclusion, adding oil to your engine is a simple task that can be done by anyone. By following these step-by-step instructions and using a funnel to avoid spills, you’ll be able to keep your engine running smoothly and prevent costly repairs in the future.
Post-application Checks
When it comes to applying engine oil, it is important to perform post-application checks to ensure proper lubrication. Follow the steps provided by experts to add oil to your car and check the oil level to keep your engine running smoothly.
Rechecking The Oil Level
After applying engine oil, it is crucial to recheck the oil level to ensure that it is at the appropriate level. This step is essential to prevent any potential damage to the engine due to insufficient lubrication. To recheck the oil level:
- Make sure that your vehicle is parked on a level surface and the engine is turned off.
- Open the hood of your car and locate the dipstick, which is usually labeled as “Engine Oil.”
- Remove the dipstick, wipe it clean with a lint-free cloth or paper towel, and then reinsert it fully into the dipstick tube.
- Take out the dipstick again and observe the oil level. The dipstick usually has markings indicating the minimum and maximum oil levels. Ensure that the oil level is between these two marks.
- If the oil level is below the minimum mark, you will need to add more oil. Refer to the manufacturer’s instructions or consult a professional if you are unsure about the correct type and quantity of oil to add.
By rechecking the oil level, you can ensure that your engine has enough oil for optimal performance and longevity.
Ensuring Everything Is Sealed And Secure
Another important post-application check is to ensure that everything is properly sealed and secure. This step helps prevent oil leaks and ensures that the oil remains contained within the engine. Here are some key areas to inspect:
- Oil Filler Cap: Check that the oil filler cap is tightly secured. If it is loose or missing, it can lead to oil leakage.
- Oil Filter: Verify that the oil filter is correctly installed and tightly sealed. A loose or improperly installed oil filter can also cause oil leaks.
- Drain Plug: Ensure that the drain plug, which is used to drain the old oil, is securely tightened. A loose drain plug can result in oil leakage.
- Gaskets and Seals: Inspect the gaskets and seals for any signs of damage or wear. Replace them if necessary to maintain a proper seal.
By checking and ensuring that everything is sealed and secure, you can prevent oil leaks and maintain the integrity of your engine oil system.
Frequent Mistakes To Avoid
When it comes to applying engine oil, it’s important to do it correctly to ensure the optimal performance and longevity of your vehicle. However, many people make common mistakes that can have negative consequences for their engine. In this section, we will discuss two frequent mistakes that you should avoid: overfilling the engine oil and ignoring the manufacturer’s recommendations.
Overfilling The Engine Oil
Overfilling the engine oil can cause serious damage to your engine and should be avoided at all costs. When you pour in more oil than the recommended amount, it can lead to excessive pressure inside the engine, which can result in leaks, engine seals failure, and even engine failure. It is crucial to follow the manufacturer’s guidelines and pour in the correct amount of oil for your specific vehicle.
One way to avoid overfilling is to use a measuring container or a funnel with markings that indicate the correct oil level. This will help you pour in the right amount of oil without any guesswork. Additionally, it is important to check the oil level regularly using the dipstick to ensure it is within the recommended range.
Ignoring Manufacturer’s Recommendations
Ignoring the manufacturer’s recommendations when it comes to engine oil can have detrimental effects on your vehicle’s performance. Each car manufacturer specifies the type of oil that is best suited for their engines. They consider factors such as viscosity, additives, and performance standards when making these recommendations.
Using the wrong type of oil or not adhering to the recommended oil change intervals can lead to decreased engine efficiency, increased fuel consumption, and even engine damage. It is crucial to consult your vehicle’s owner’s manual or contact the manufacturer to determine the appropriate oil type and change intervals for your specific car.
By following the manufacturer’s recommendations, you can ensure that your engine receives the right lubrication and protection, maximizing its performance and lifespan.
In conclusion, it is important to avoid common mistakes when applying engine oil. Overfilling the engine oil and ignoring the manufacturer’s recommendations can have serious consequences for your vehicle. By taking the time to pour in the correct amount of oil and using the recommended oil type, you can keep your engine running smoothly and avoid costly repairs in the future.
Proper Disposal Of Used Oil
When it comes to applying engine oil, it’s important to also consider the proper disposal of used oil. After changing the oil, make sure to collect and store the used oil in a leak-proof container and take it to a recycling center or an auto parts store for proper disposal.
This helps to protect the environment and prevent pollution.
Environmental Considerations
Proper disposal of used engine oil is crucial for protecting the environment. When oil is not disposed of properly, it can contaminate soil, water sources, and harm wildlife. It’s important to follow the correct procedures to ensure that used oil is recycled or disposed of in a safe and environmentally friendly manner.
Locating Oil Recycling Facilities
When it’s time to dispose of used oil, finding a certified oil recycling facility is essential. Many auto parts stores, service stations, and recycling centers accept used oil for recycling. To locate a facility near you, you can check with your local recycling center or use online resources such as Earth911 to find certified oil recycling locations in your area.
Advanced Tips For Engine Oil Application
Ensure optimal engine performance with these advanced engine oil application tips. Start by checking the oil level, then unscrew and remove the oil filler cap. Add small amounts of oil at a time using a long-neck funnel, and recheck the oil level frequently while filling to avoid overfilling and potential engine problems.
Temperature Considerations For Oil Application
When applying engine oil, it’s crucial to consider the temperature of the environment. Extreme temperatures can impact the viscosity of the oil, affecting its flow and ability to lubricate the engine effectively.
Long-term Storage And Oil Changes
Proper storage is essential for maintaining the quality of engine oil over time. Long-term storage can lead to oil degradation, which may compromise its performance. Additionally, regular oil changes are necessary to ensure optimal engine lubrication and protection.
Troubleshooting Common Oil Application Issues
When it comes to applying engine oil, it’s essential to ensure that the process is done correctly to maintain the performance and longevity of your engine. However, there are some common issues that can arise during the oil application process. In this section, we will discuss two of the most common problems that car owners face – oil leaks and oil contamination. Understanding how to deal with these issues will help you maintain your engine’s health and prevent any potential damage.
Dealing With Oil Leaks
Oil leaks can be a cause for concern as they not only lead to a loss of lubrication but can also indicate underlying issues with your engine. Here are a few steps you can take to address oil leaks:
- Identify the source: Start by locating the origin of the leak. Check for any visible signs of oil dripping or pooling underneath your vehicle.
- Tighten loose fittings: If you find any loose fittings or connections, such as oil filter or drain plug, tighten them securely. This can often resolve minor leaks.
- Inspect gaskets and seals: Check the gaskets and seals in your engine for any signs of wear or damage. If you notice any issues, it is advisable to replace them to prevent further leaks.
- Consult a professional: If you are unable to identify or fix the source of the leak, it’s best to consult a professional mechanic who can diagnose and repair the issue.
Addressing Oil Contamination
Oil contamination can occur due to various factors, such as dirt, debris, or other fluids mixing with the engine oil. Here are some steps to address oil contamination:
- Inspect the oil: Check the oil’s color and consistency. If you notice a milky appearance or a gritty texture, it indicates contamination.
- Change the oil and filter: If the oil is contaminated, it’s crucial to drain and replace it along with the oil filter. This will ensure that clean oil circulates through your engine.
- Identify the source of contamination: Determine the cause of the contamination, such as a coolant or fuel leak. Fixing the underlying issue will prevent future contamination.
- Regular maintenance: Maintain a regular oil change schedule and follow the manufacturer’s recommendations to minimize the risk of contamination.
By addressing oil leaks and contamination promptly, you can avoid potential engine damage and ensure optimal performance. Remember, if you are unsure about any aspect of oil application or encounter persistent issues, it is always best to consult a professional mechanic for guidance.
Credit: www.migjimenez.com
Faqs On Engine Oil Application
When it comes to maintaining your vehicle, applying engine oil correctly is crucial. Here are some frequently asked questions about engine oil application:
Can You Add Oil To A Hot Engine?
It’s not advisable to add oil to a hot engine, as the high temperature can cause the oil to evaporate quickly, leading to inaccurate oil level readings. It’s best to wait for the engine to cool down before adding oil to ensure an accurate measurement.
How Often Should You Top Up Engine Oil?
Checking your engine oil regularly is essential to ensure that it’s at the optimal level. Factors such as the age of the vehicle, driving conditions, and oil consumption should be considered. As a general rule, it’s recommended to check the oil level every 1,000 miles and top up as needed to maintain the proper oil level.
Frequently Asked Questions
What Is The Proper Way To Put Oil In A Car?
To properly put oil in a car, follow these steps: 1. Turn off the engine and let it cool. 2. Remove the oil filler cap. 3. Slowly pour in small amounts of oil at a time. 4. Check the oil level frequently while filling.
5. Do not overfill the engine. Remember to use a long-neck funnel for easier pouring.
Do You Just Pour Engine Oil In?
No, you do not just pour engine oil in. To properly add oil to your engine, turn off the vehicle and allow the engine to cool. Remove the oil filler cap and slowly pour in small amounts of oil at a time, checking the oil level frequently.
Avoid overfilling the engine to prevent any problems.
How Is Oil Applied To An Engine?
Oil is applied to an engine through an oil pump located at the bottom of the engine. The pump is driven by a worm gear off the main exhaust valve camshaft. The oil is pumped to the top of the engine inside a feed line, and small holes in the feed line allow the oil to drip inside the crankcase.
To add oil, turn off the engine, remove the oil filler cap, and slowly pour in small amounts at a time while checking the oil level frequently.
Does The Engine Need To Be Running When Adding Oil?
No, the engine should not be running when adding oil. Turn off the vehicle and wait for the engine to cool down before adding oil. Pour in small amounts at a time, checking the oil level frequently to avoid overfilling.
Use a long-neck funnel for easier and cleaner oil application.
Conclusion
Proper engine oil application is essential for vehicle maintenance. Follow the manufacturer’s guidelines and use the correct oil grade. Regularly check the oil level and top up as needed. It’s crucial to add oil slowly and avoid overfilling. By adhering to these steps, you’ll ensure optimal engine performance and longevity.